

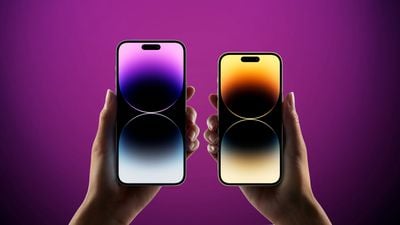
In case you have been fortunate sufficient to be gifted an iPhone 14 for the vacations, we have a collection of helpful ideas and methods for you that may assist you to get essentially the most out of your new system.
First, should you’re fully new to the iPhone otherwise you simply need a refresher, we’ve got an extended checklist of fundamental tips about use your iPhone and iOS 16.
iPhone Ideas for Inexperienced persons
iOS 16 Guides and Tutorials
Wish to know much more about iOS 16? We have now a devoted walkthrough that has guides and the way tos that cowl each new characteristic.
Ideas and Tips to your New iPhone
Past the fundamentals, listed here are much more helpful tips on your new iPhone:
1. Examine Your iPhone Guarantee
In case you want a restore, wish to decide up AppleCare+ to your new iPhone, or simply wish to see your guarantee standing and what’s out there to you, you are able to do it proper in your system.
- Open up the Settings app.
- Faucet on “Common.”
- Faucet on “About.”
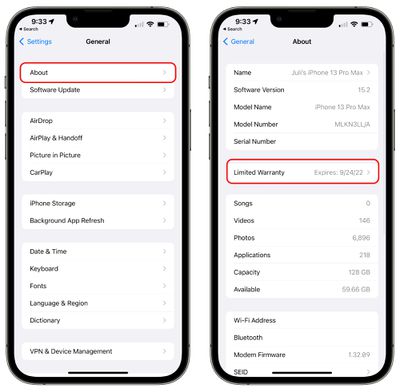
- Faucet on “Restricted Guarantee” or “AppleCare+” to see your system standing.
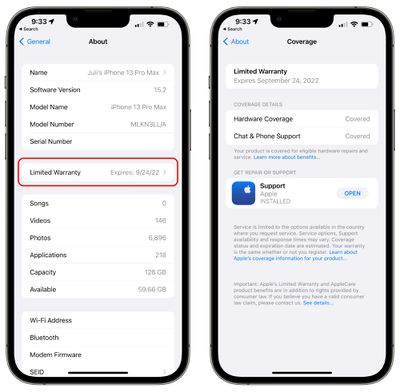
When you have AppleCare+, the part can be labeled with AppleCare+ and can let your AppleCare expiration date. In case you do not, it is going to say “Restricted Guarantee” and it’ll let when it expires.
AppleCare+ is nice for 2 years or indefinitely should you renew it month-to-month or yearly, and it covers producer points and two incidents of unintentional harm per 12 months as long as you pay the deductible. It is typically a good suggestion should you’re accident-prone and wish to be sure to can get an reasonably priced repair should you drop or in any other case harm your telephone.

The Restricted Guarantee is Apple’s producer guarantee that lasts for a 12 months after buying your iPhone. It entitles you to {hardware} assist for any manufacturing points, and it permits for a 12 months of chat and telephone assist.
With the Restricted Guarantee, as soon as that 12 months is up, your iPhone is taken into account out of guarantee. In case you did not buy AppleCare+ whenever you purchased your telephone and wish to get it, you could have 60 days to take action.
2. Auto Schedule Low Energy Mode to Save Battery
Utilizing the Shortcuts app, you’ll be able to create an automation that may trigger Low Energy Mode to return on routinely at a sure battery share, so you will not want to show it on manually.
- Open up the Shortcuts app.
- Faucet on “Automation.”
- Faucet on the “+” button.
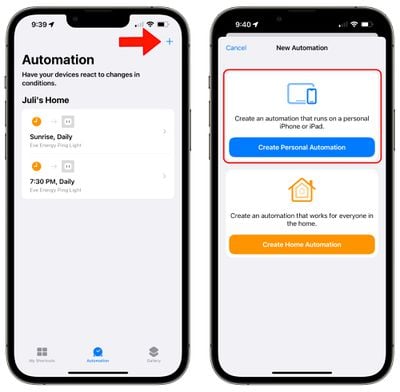
- Faucet on “Create Private Automation.”
- Scroll right down to “Battery Degree.”
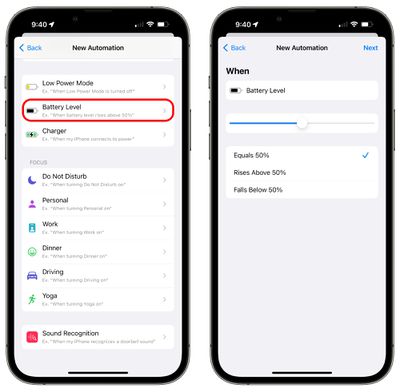
- Faucet on the parameter that you really want. Choices embrace “Equals x%,” “Rises Above x%,” and “Falls under x%.” You will wish to use “Falls Beneath” or “Equals” for this Shortcut.
- Use the slider to pick a selected share.
- Faucet “Subsequent.”
- Faucet “Add Motion.”
- Seek for “Low Energy Mode.”
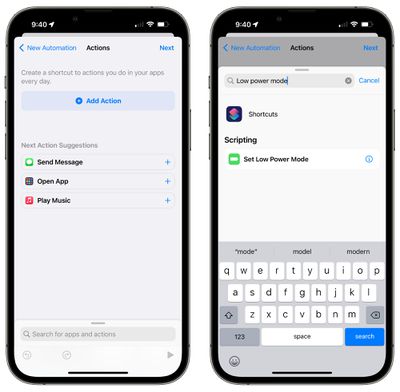
- Faucet on “Set Low Energy Mode.”
- Faucet on “Subsequent.”
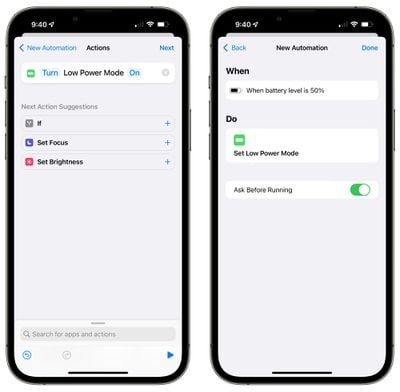
- If you’d like your iPhone to ask you earlier than turning on Low Energy Mode, depart the “Ask Earlier than Working” toggle activated. If not, flip it off.
- Faucet “Performed.”
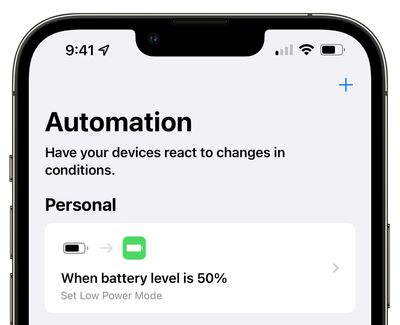
From there, your Shortcut will run any time your iPhone hits the brink that you just set for Low Energy Mode. You possibly can modify the setting within the Automation part of the Shortcuts app.
If you wish to set Low Energy Mode to return on at a sure time, comply with the above steps however use “Time of Day” as the primary parameter, select a time, after which comply with steps 8 via 14.
Low Energy Mode is designed to chop down on background processes to protect battery life when your iPhone is low on battery, and your iPhone will routinely current a Low Energy Mode pop-up suggestion when the battery dips under 20 %. Utilizing the Shortcuts app to create the Low Energy Mode automation is a helpful method to get Low Energy Mode to return on when your battery is at a better share.
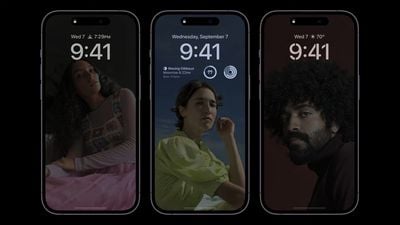
3. Customise Your Lock Display
With the iOS 16 replace, Apple overhauled the Lock Display, introducing customizable wallpaper, widgets, time, and date. You possibly can choose from all types of built-in wallpaper choices, some which can be even interactive, select helpful app widgets to point out on the Lock Display, and customise the look and coloration of the time.

We have now devoted guides and the way tos on all the Lock Display options which can be linked under, but it surely’s simple to get to all the settings so you’ll be able to take a look.
- On the Lock Display, unlock with Face ID or Contact ID.
- Lengthy press on the show.
- Faucet on the “+” button to create a brand new Lock Display.
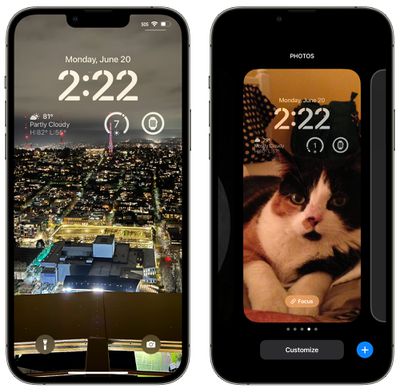
- Choose your wallpaper from the out there choices.
- Faucet on the time to alter the look.
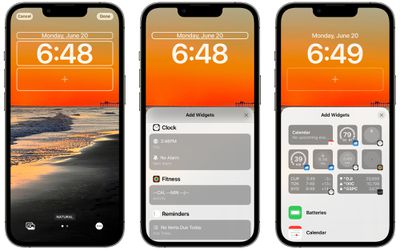
- Faucet on “Add Widgets” to decide on widgets to go on the Lock Display.
- Faucet up above the time to customise the widget positioned in that spot.
That is all there’s to it. There’s loads to discover on the Lock Display, so you may positively wish to flick through our information to see all the out there choices if you have not used iOS 16 earlier than.
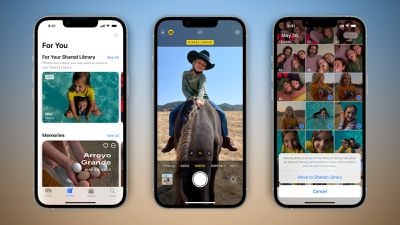
4. Set Up iCloud Shared Photograph Library
In case you’re not utilizing it already, iCloud Shared Photograph Library is a hassle-free method to alternate images with family and friends members. You are solely going to wish to use it together with your closest family and friends, but it surely mainly allows you to share all your pictures in a devoted library that works similar to the usual Photograph Library.
- Open up the Settings app.
- Scroll right down to Pictures.
- Faucet on Shared Library.
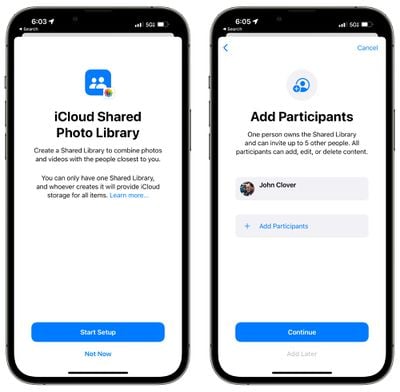
- Faucet on Set Up.
From there, you are going to wish to undergo all the out there setup steps, which incorporates including members and selecting the images that you just wish to share.
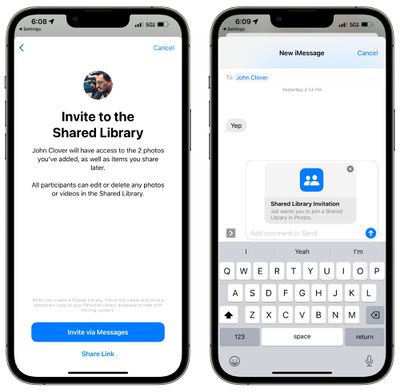
You possibly can count on iCloud Shared Photograph Library to work precisely like the usual library, however with a couple of person. All members can add and delete images, and images that you just add to the library are moved to your private library.
There are loads of intricacies to cope with on the subject of iCloud Shared Photograph Library, so you’re completely going to wish to learn our devoted iCloud Shared Photograph Library information earlier than setting it up.
5. Customise Your Safari Begin Web page
You possibly can change what’s displayed in your Safari begin web page, opting in to (or out of) sections like Incessantly Visited, Shared With You, Siri Recommendations, and extra, plus you’ll be able to decide a customized wallpaper.
- Open up Safari.
- Open up a brand new clean web page.
- Scroll all the best way right down to the underside of the web page.
- Faucet on “Edit.”
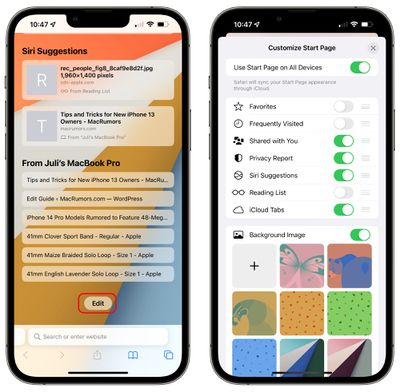
- Toggle on the sections that you just choose.
- Toggle on “Background Picture” if you wish to decide a customized background for Safari. You possibly can select from the out there Apple-designed backgrounds or use your personal picture by tapping on the “+” button.
- If you’d like the identical Begin Web page on all units the place you are signed into iCloud, toggle on “Use Begin Web page on All Units” on the high of the web page.
- While you’re all accomplished customizing, faucet on the “X” button within the higher proper hand nook.
Choices that you may toggle on or off embrace Favorites, Incessantly Visited, Shared With You, Privateness Report, Siri Recommendations, Studying Checklist, and iCloud Tabs.
6. Change Your Safari Design
Apple tried to introduce an overhauled Safari design in iOS 15 with floating tabs and an interface that merged the tab bar and the URL bar, however the modifications weren’t effectively obtained and Apple in the end reverted to the usual iOS 14 Safari design.
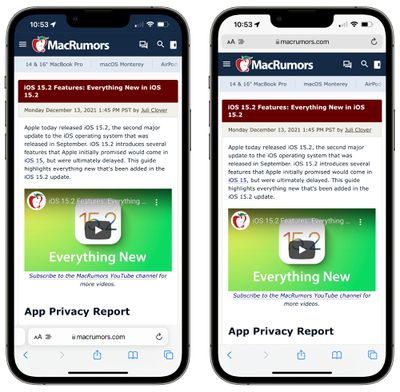
Safari Tab Bar on backside (left), Safari Tab Bar on high (proper)
There are nonetheless remnants of that new Safari design, although, and you’ll elect to maneuver your Safari Tab Bar to the underside of the Safari interface, and you’ll selected to activate “Enable Web site Tinting,” a characteristic that blends the background coloration of the web site with the URL bar.
- Open up the Settings app.
- Scroll right down to Safari.
- Beneath Tabs, choose the “Tab Bar” possibility for a tab bar positioned on the backside of the Safari window. Select “Single Tab” for the highest bar.
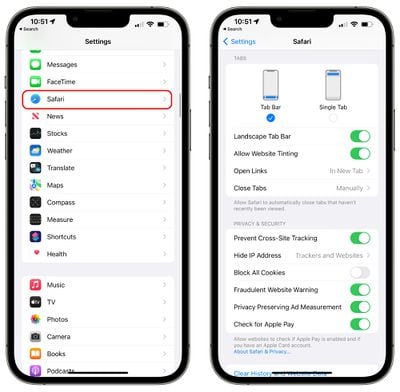
- Toggle on “Enable Web site Tinting” if you wish to have the colour mixing characteristic when utilizing the highest bar, and select “Panorama Tab Bar” if you wish to see your open tabs when the iPhone is held horizontally.
Word that “Enable Web site Tinting” is a characteristic that exhibits up when utilizing the highest bar. It causes the URL bar to show the background coloration of the web site whenever you scroll down on a web page for a extra seamless look.
Tip: You can too swap between the highest and backside navigation bars in Safari itself. Simply faucet on the “Aa” icon within the URL bar after which select “Present Backside Tab Bar” or “Present High Tackle Bar.”
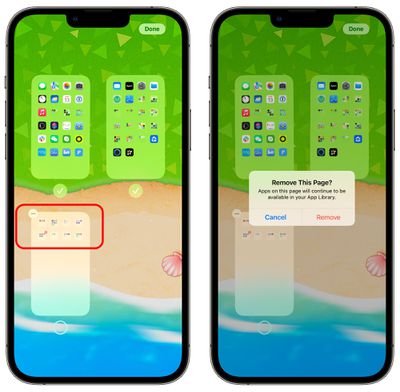
7. Rearrange Your Residence Display Pages
If you wish to rearrange your numerous Residence Display pages that home apps, you are able to do so shortly and simply.
- Press and maintain in an empty house on the Residence Display to enter “jiggle mode,” the place the app icons are wiggling barely.
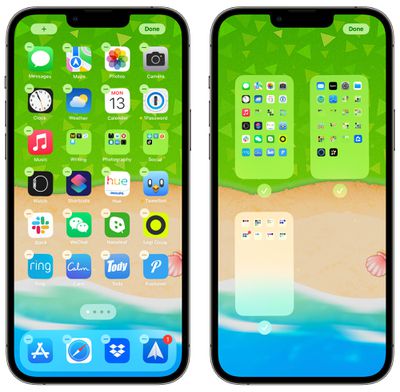
- Faucet on the row of dots on the backside of the web page.
- Your Residence Display pages can be proven in a grid view. Put a finger on one web page and drag it to maneuver it to a brand new place relative to your different pages.
- Upon getting your pages the best way you need them, faucet on “Performed” within the higher proper nook.
Tip: You can too delete Residence Display pages utilizing this interface. On the grid view, faucet on the checkmark below the web page that you just wish to remove, after which faucet on the minus (-) icon to delete it.
8. Edit and Undo Ship Messages
In case your new telephone is the primary time you are utilizing iOS 16, it’s best to know that there are new options within the Messages app to pay attention to. You possibly can each Edit and Undo Ship on iMessages that you just despatched, so long as the individual you are chatting with additionally has an iPhone and has iOS 16 put in.
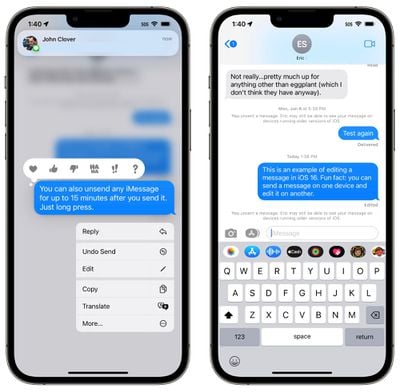
Utilizing these options is so simple as lengthy urgent on a message you’ve got simply despatched to see the choices. Word that there are deadlines to pay attention to. You possibly can unsend a message as much as two minutes after sending it, and edit for as much as quarter-hour.
There are a bunch of different Messages options for issues like reporting junk, marking messages as unread, and recovering deleted messages, with information out there in our iOS 16 Messages information.
9. Retailer Two-Issue Authentication Codes in Passwords
It is a good suggestion to arrange two-factor authentication for any on-line account the place the characteristic is on the market, and with iOS 15, you not want a separate verification code app like Google Authenticator or Authy for storing one-time passwords. Two-factor authentication codes (or one-time passwords) are the secondary passcodes that you just use when logging into a web site, with these codes regenerated each 30 seconds, which makes it way more tough to your accounts to be breached.
Apple now has a built-in characteristic for storing two-factor authentication codes proper alongside your iCloud Keychain passwords. Here is add a code:
- Open up the Settings app.
- Scroll right down to “Passwords.”
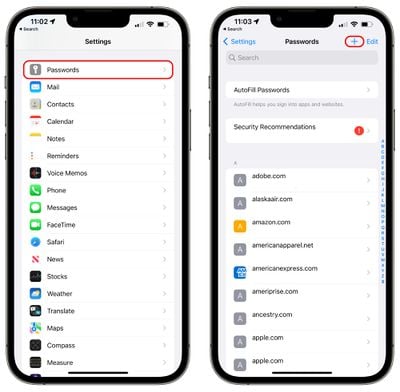
- In case you’re including a two-factor code for a login and password already saved in iCloud Keychain, seek for the entry that you just’re on the lookout for. In any other case, faucet the “+” button so as to add a brand new login.

- After both accessing your login and password for the account you are considering or including new particulars, faucet on “Set Up Verification Code.”
- Provoke the two-factor authentication course of for the web site or account the place you are enabling two-factor verification.
- For a lot of companies, you are supplied with a QR code that you may scan to arrange two-factor authentication, although this does require two units. When you have a QR code to scan, faucet on the “Scan QR Code” possibility. Alternatively, faucet on “Enter Setup Key” and enter the quantity that you just’re supplied from the web site.
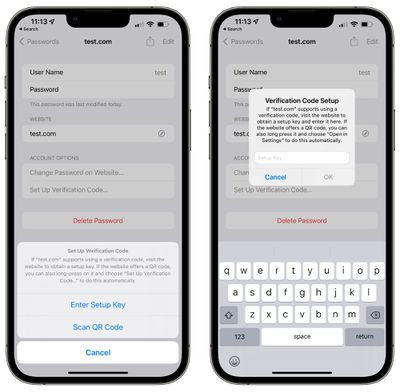
- After the QR code is scanned or the Setup Secret is entered, the login will routinely replace with the verification key.
As soon as arrange, you should use the verification code discovered within the Passwords app at any time when it is advisable confirm your identification with a one-time passcode for that web site or service. In case you maintain down on the verification code, you’ll be able to copy it after which paste it into the location the place it is wanted, and when you have iCloud Keychain enabled, it is going to autofill throughout your units.
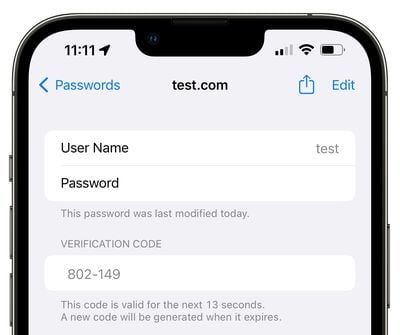
You will have to set this up individually for every web site that makes use of two-factor authentication.
Tip: In case you’re establishing two-factor authentication on a web site in your iPhone, whenever you see the QR code, lengthy press on it together with your finger. You will see an choice to “Add Verification Code in Passwords,” and should you faucet it, you’ll be able to routinely add the two-factor verification to your web site login while not having to scan a QR code.
10. Maximize Your Privateness With iCloud Non-public Relay and Conceal My E-mail
Beginning with iOS 15, Apple made net shopping and sending e-mail safer by chopping down on the ways in which corporations can monitor your on-line conduct. iCloud Non-public Relay, for instance, obscures private data like IP handle and placement, which can be utilized to trace your shopping throughout totally different web sites. iCloud Non-public Relay works within the background (if you wish to know the way, we’ve got a information) and it does require a paid iCloud account, priced at $0.99 and up per thirty days.
On any new system, you are going to wish to be sure to have iCloud Non-public Relay turned on by following these steps:
- Open up the Settings app.
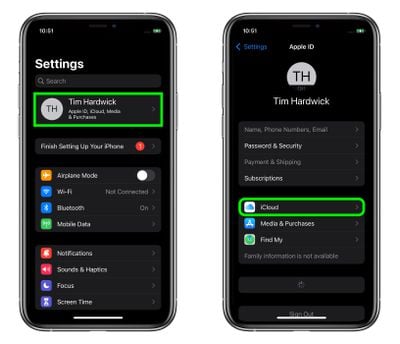
- Faucet in your identify to open up your Apple ID and iCloud settings.
- Faucet on “iCloud.”
- Faucet on “Non-public Relay.”

- Be certain that “Non-public Relay” is toggled on.
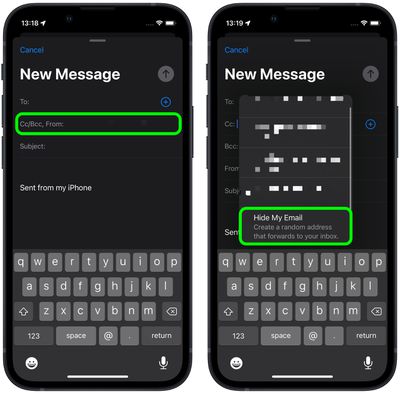
Conceal My E-mail, which additionally requires a paid iCloud account, allows you to create totally different e-mail addresses for every web site, so you’ll be able to disable them should you begin getting spam or different undesirable content material from somebody you’ve got interacted with. Conceal My E-mail momentary addresses all ahead to your major Apple e-mail handle and could be simply managed.
You need to use Conceal My E-mail in two methods. It is so simple as opening up the Mail app and composing an e-mail. Within the From subject, faucet after which select “Conceal My E-mail” to routinely generate a random handle that may ahead to your inbox.
Alternatively, comply with these steps:
This Conceal My E-mail interface within the Settings app can be the place you’ll be able to handle all the momentary e-mail addresses that you have created. You possibly can deactivate any of the momentary e-mail addresses at any time and the corporate or person who has that e-mail handle will not be capable to contact you.
Tip: You possibly can change the e-mail handle that your Conceal My E-mail addresses ahead to by following our Conceal My E-mail tutorial.
11. Arrange Focus Modes and Hyperlink Focuses to Lock Screens
When you have personalized Lock Screens you’ve got created, you’ll be able to hyperlink them to a selected Focus Mode, which suggests you’ll be able to arrange devoted Lock Display and Residence Display interfaces to your totally different modes like work, dwelling, train, and extra. Switching to that Lock Display prompts the Focus, and that Lock Display may even come up when you have the Focus set to activate at a selected time.
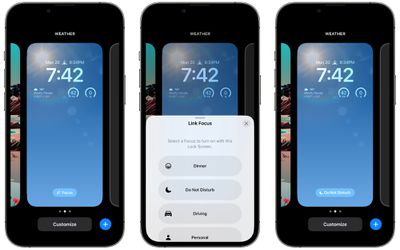
- On the iPhone’s Lock Display, unlock with Face ID or Contact ID.
- Lengthy press to get to the Lock Display customization interface.
- In your Lock Display of alternative, faucet on “Focus.”
- Select one among your Focus modes to hyperlink it to the Lock Display. In case you already had a Focus mode arrange, that is all it is advisable do. Swapping to the Lock Display will now activate the Focus mode linked to it.
- If it is advisable create a brand new Focus or customise an current Focus, faucet on Focus settings on the backside of the web page.
- Within the Focus interface, faucet on “+” or one of many current Focus modes to alter it up. From there, comply with the on-screen directions.
Focus modes are tremendous helpful if you wish to separate work life and residential life or minimize down on distractions when finding out, understanding, cooking, meditating, and extra. You possibly can set particular apps and in iOS 16, even select particular Mail accounts and Safari tab teams to be accessible.
That mentioned, Focus modes could be a lot, so we do have a devoted Focus information that walks via the whole lot it is advisable know to get the iOS 16 Focus options arrange.
12. Have Enjoyable With Take away Topic From Background
Apple’s iPhone 14 fashions (and all iPhones operating iOS 16) have a enjoyable characteristic that permits you to pull the topic from any picture or picture so you’ll be able to copy it and use it in Messages, emails, and extra.
- Choose a photograph, Safari net picture, or one other picture that has a transparent topic.
- Place your finger on the display screen over the topic and maintain it there gently.
- You will see a glowing border encompass the topic.
- Faucet on the “Copy” possibility to repeat it to your clipboard, or on Share to drop it into an e-mail or a message.
- Alternatively, drag the highlighted picture with a finger and open up one other app to drop it in.
Apple makes use of machine studying performance for this characteristic, so it may be a method to create little stickers of your personal out of your images or so as to add a brand new background for a topic picture. It is not excellent and it really works finest when there is a clear coloration distinction between the topic and the background, but it surely’s enjoyable to play with.
13. Use Your iPhone as a Webcam for Your Mac
When you have a Mac operating macOS Ventura, you should use your iPhone 14 as a webcam, bypassing the decrease high quality built-in webcam of the Mac. You will have just a little stand to connect your iPhone to your Mac, and Belkin sells choices for each Mac notebooks and Mac desktops, plus you may get reasonably priced stand choices on Amazon.

Upon getting a stand, together with your iPhone 14 hooked up to your Mac, all it is advisable do is begin up an app that makes use of the Digicam like FaceTime, and your iPhone will routinely work because the Mac’s digital camera.
There are options like Middle Stage to maintain you in body as you progress round, Portrait Mode to blur the background, and Desk View to point out off what you are doing in your desk for demonstrations. If
14. Get Acquainted with the Dynamic Island
When you have an iPhone 14 Professional, you could have a Dynamic Island as an alternative of a notch just like the iPhone 14 fashions and prior-generation iPhone 13 fashions. The Dynamic Island is interactive, so you may see apps and numerous iPhone options in that little pill-shaped field.
Here is a few of what Dynamic Island can show by default:
- Apple Pay transaction confirmations
- Privateness indicators when microphone or digital camera is in use
- AirDrop file transfers
- AirPods connection standing and battery life
- iPhone charging standing and battery life
- Low battery alerts
- Silent mode turned on or off
- Face ID unlocking
- Apple Watch unlocking
- NFC interactions
- AirPlay connections
- Focus mode modifications
- Shortcut actions
- Airplane mode/no knowledge alerts
- SIM card alerts
- Equipment connecting
- Discover My alerts
- Shortcuts
- Upcoming and turn-by-turn Maps instructions
- Incoming telephone name and period of name
- Time remaining of taking part in tune
- Lively timers
- Stay Exercise information
- SharePlay periods
- Display Recording
- Voice memo recordings
- Private Hotspot connection
You can too obtain apps which have assist for the Dynamic Island, and something with a Stay Exercise can show that data within the Dynamic Island. You possibly can monitor automotive rides, control sports activities video games, monitor timers, and extra. We have a listing of third-party apps that assist the Dynamic Island should you’re on the lookout for choices.

We even have much more data on the Dynamic Island and what it will probably do in our devoted information.
15. Do a Security Examine
After you’ve got arrange your iPhone 14, whether or not you are setting it up as new or transferring information and settings from one other system, it’s best to do a Security Examine. Added in iOS 16, Security Examine is designed to stroll you thru all the privateness and safety features in your system, so you’ll be able to see who you are sharing data and placement with.
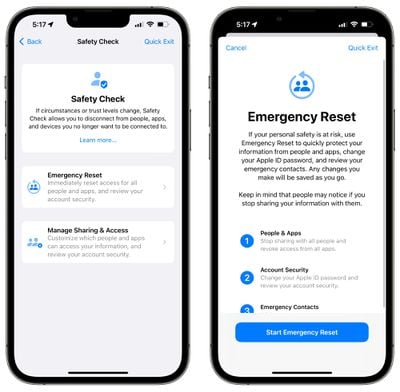
This characteristic is designed for individuals to shortly reset all the knowledge and placement entry they’ve granted to others, particularly in a home violence state of affairs, however it’s also very helpful for retaining monitor of which individuals and apps have entry to your information.
- Open up the Settings app.
- Faucet on Privateness and Safety.
- Scroll right down to Security Examine and faucet it.
- Faucet on Handle Sharing and Entry.
- Authenticate with Face ID.
- From there, undergo all the steps to see what you are sharing with others, from location to images and notes. If you wish to change one thing, faucet on the choice, and should you do not, faucet on skip to maneuver on.
- Be certain that to take your time and undergo all the totally different choices since you’ll additionally see lists of all of the apps which have entry to your knowledge, which units are signed into your Apple ID, and extra.
Word that you will additionally see an Emergency Reset possibility right here, however except you are in a state of affairs the place it is advisable instantly revoke all entry to your location companies, you are not going to wish to use that. We have now a extra in-depth have a look at Security Examine in our privateness and safety information.
16. Check Emergency SOS by way of Satellite tv for pc
All the iPhone 14 fashions assist Crash Detection and Emergency SOS by way of Satellite tv for pc, which is designed to help you get assist in an emergency even when there is not any WiFi or mobile connection out there. You are not going to wish to check out Crash Detection, however you’ll be able to take a look at Emergency SOS by way of Satellite tv for pc to get conversant in the way it works.
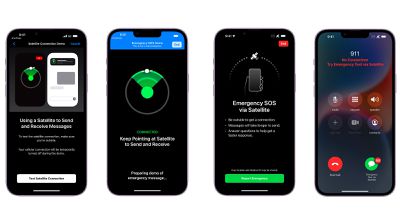
- Open the Settings app in your iPhone.
- Scroll down and faucet Emergency SOS.
- Beneath “Emergency SOS Through Satellite tv for pc,” faucet Attempt Demo.
- Comply with the directions to try it out.
Be certain that to familiarize your self with the steps that you will comply with in an actual emergency, which really simply includes making an attempt to make an emergency name.
- Launch the Telephone app.
- Dial emergency companies (911 in america).
- When the decision fails, faucet the inexperienced Emergency Textual content by way of Satellite tv for pc button that seems.
- Comply with the onscreen prompts to speak your emergency.
There isn’t any method to make telephone calls utilizing the SOS by way of Satellite tv for pc characteristic, however you’ll be able to ship quick textual content messages, which is how assistance will arrive to you. The iPhone will ask you vital inquiries to assess the state of affairs, passing that alongside to emergency personnel who can then talk additional with you and get a rescue staff to you.
Emergency SOS by way of Satellite tv for pc has been used efficiently in a number of emergency conditions to this point.
Bonus: In case you’re in a distant location and haven’t any entry to mobile service or WiFi, you should use Emergency SOS by way of Satellite tv for pc to replace your location with the Discover My app, so family and friends can see the place you’re.
- Open the Discover My app in your iPhone 14.
- Faucet the Me tab on the bottom-right nook of the display screen.
- Swipe up on the cardboard to disclose “My Location by way of Satellite tv for pc.”
- Faucet Ship My Location.
17. Customise All the time On Show (iPhone 14 Professional)
For these fortunate sufficient to have an iPhone 14 Professional, there’s an all the time on show possibility that mirrors the all the time on show on the Apple Watch. With all the time on show, you’ll be able to proceed to see your wallpaper, the time, widgets, and incoming notifications even when your iPhone is locked and never in use.
There are a number of customizations out there, and when you have the most recent model of iOS, you’ll be able to flip off wallpaper and notifications if you would like, for an much more minimal expertise.
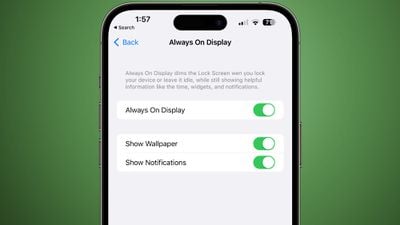
Here is get to your all the time on show settings:
- Open up the Settings app.
- Select Show and Brightness.
- Scroll right down to All the time On Show.
- Faucet on the toggles for Present Wallpaper and Present Notifications to allow or disable these options.
Be taught Extra About iPhone 14
We have now devoted iPhone 14 and iPhone 14 Professional roundups which have a whole rundown of all the options out there within the iPhone 14, iPhone 14 Plus, iPhone 14 Professional, and iPhone 14 Professional Max, they usually’re price trying out should you’re nonetheless attending to know your new iPhone.
We additionally have an iOS 16 roundup that is an awesome useful resource for getting conversant in the whole lot the most recent iPhones can do.