
AppleInsider might earn an affiliate fee on purchases made via hyperlinks on our web site.
In a earlier article, we checked out connecting varied sorts of Arduino {hardware} to your Mac. Here is the best way to get began programming on them to create your individual initiatives.
Getting began
With a purpose to program your Arduino, you want the Arduino IDE (Built-in Growth Atmosphere) from the arduino.cc web site. We talked about the best way to obtain and set up the IDE within the earlier article however we’ll reiterate it right here:
In your Mac, go to arduino.cc, click on on “Software program”, then underneath the Obtain Choices part, click on the hyperlink for the Mac model for both Intel or Apple Silicon.
Observe that until you need to discover the present improvement model, you do not need the hyperlink underneath the part “Nightly Builds”. Nightly builds could also be unstable and include bugs.
As soon as you have downloaded the IDE, consult with the earlier article for particulars about the best way to join and arrange your Arduino in your Mac within the IDE. You want a connection earlier than you may add code from the IDE to your Arduino.
Fundamentals
You solely want rudimentary programming abilities to program your Arduino. You need to use Arduino’s C-like programming language, or Python, however we’ll solely use C within the examples beneath.
In Arduino packages, known as Sketches, you primarily write code to arrange your Arduino for a selected duties or duties, then run a steady loop which will get known as repeatedly by the Arduino microcontroller as soon as your Sketch is uploaded to your Arduino machine. The loop often waits for enter from sensors or customers, and sends management alerts again to sensors and units to show some form of output.
The loop code may hook up with, and work together with, the web.
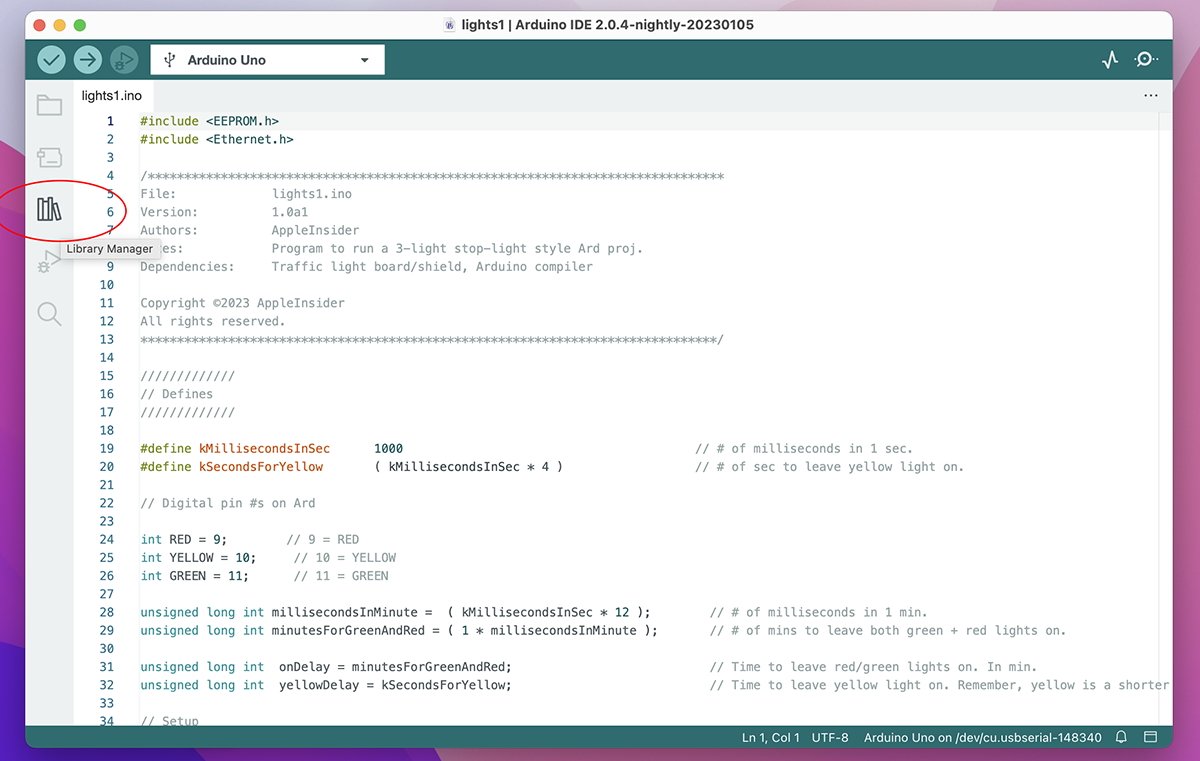
You too can set up third-party libraries which help varied sensor units and shields utilizing the Library Supervisor within the IDE. To entry the Library Supervisor, create or open a sketch window, and click on the icon on the left aspect which appears like a set of books:
A pane will seem and on the prime, you may browse accessible libraries by Sort and Matter by clicking both of the 2 popup menus:

You too can test for put in library updates by choosing “Updatable” from the “Sort:” menu.
The Library Supervisor pane allows you to obtain official and third-party libraries. Libraries are code bundles that add a selected performance or machine help to the IDE.
For instance, in case you use a selected model of a non-generic sensor, you may have to obtain its library and set up it first.
You may view completely different classes of libraries by clicking the “Matter” popup menu on the prime of the Library Supervisor window.
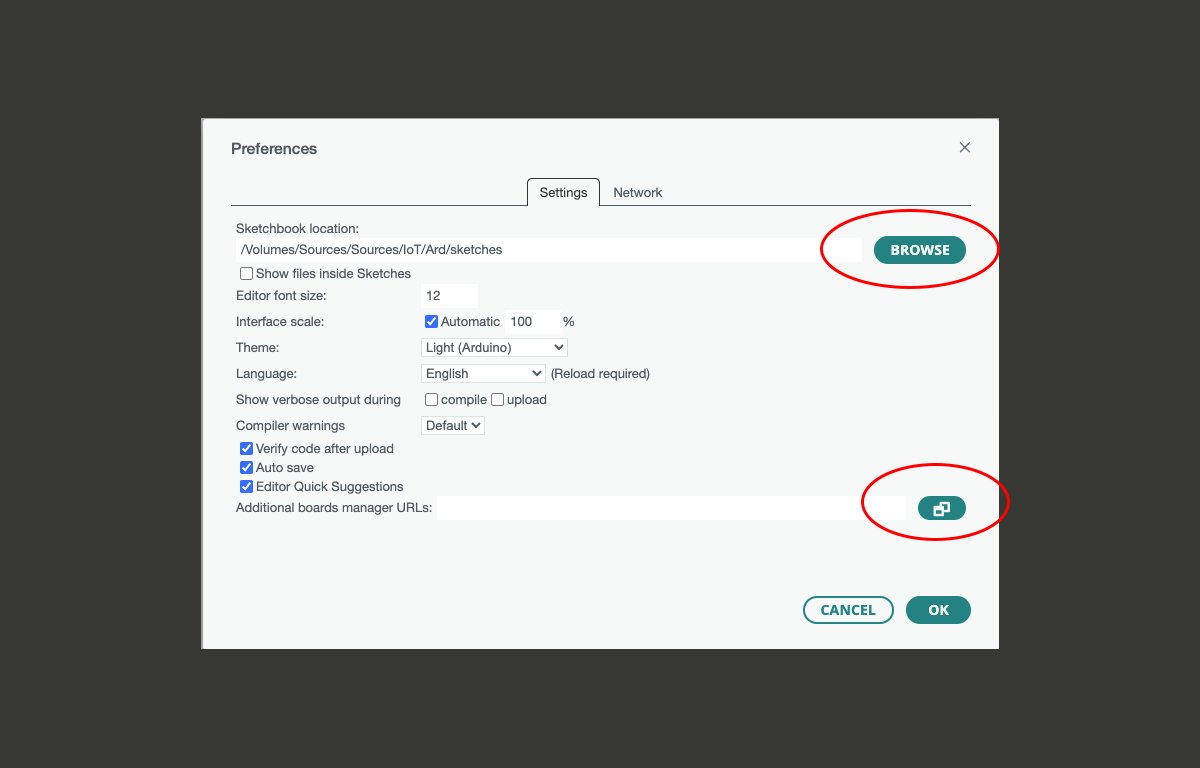
Most Arduino Sketches are easy and quick and are saved in a “Sketchbook” folder specified within the Arduino IDE Settings window. You may change the place the IDE shops sketches from right here by clicking the Browse button subsequent to “Sketchbook location”:
Sketches have a file extension of .ino, which stands for “innovation”.
You too can change textual content editor and compiler settings right here. If in case you have an unsupported Arduino, you may add its board help file or URL by clicking the small icon within the decrease proper of the window, one which appears like a stack of paperwork.
Click on on the “Click on for an inventory of unofficial board help URLs” textual content within the Further Boards Supervisor URLs window to view the huge array of boards supported on Arduino’s GitHub.
The Arduino IDE offers a pattern sketch with a easy program define in a textual content window if you first open it.
There are additionally an unlimited array of code samples underneath the File->Examples submenu merchandise. Samples are organized by “Constructed-In” and “UNO Examples” within the menu. Customized-installed libraries may additionally present examples.
A primary instance sketch
In our first instance, we’ll use the built-in Blink instance. To open it, choose File->Examples->0.1Basics->Blink submenu merchandise.
After a couple of seconds, a brand new editor window will open with the Blink instance. Ensure your Arduino board and port are chosen from the connection popup menu on the prime of the IDE’s editor window.
Blink does one factor — it blinks a built-in LED on the Arduino. There is a description of the pattern within the remark on the prime of the editor window and on-line.
In code, feedback are notes programmers go away to explain what code is doing. Feedback are ignored throughout compilation.
The IDE editor window makes use of C-style feedback: the compiler will ignore something bracketed within /* and */. Single-line feedback begin with // however should be on one line solely. Something after the // is ignored.
While you click on the massive Confirm button with the checkmark icon within the editor’s higher left nook, the IDE will compile the code in that window.
Throughout compilation, an Output pane will seem on the backside of the editor window in black exhibiting progress. If there aren’t any errors, you may see messages equivalent to:
"Sketch makes use of 924 bytes (2%) of program space for storing. Most is 32256 bytes.
International variables use 9 bytes (0%) of dynamic reminiscence, leaving 2039 bytes for native variables. Most is 2048 bytes."
If there are errors, they are going to seem in crimson textual content and you will have to repair your code till there aren’t any extra errors. Some errors usually are not vital, and your sketch will nonetheless run with them, however different errors can stop your sketch from operating in any respect.
You may clear the Output messages by clicking the small icon within the higher proper nook of the Output pane. You may conceal the Output pane fully by clicking the small sq. icon within the decrease proper nook of the editor window.
While you click on the Add button (the one with a big proper arrow icon) subsequent to the Confirm button, the IDE uploads the compiled binary program into the Arduino on the port you specified. The Arduino microcontroller takes over from there and executes your code on the Arduino.
Throughout add, in case your Arduino has an RX (Obtain) LED built-in, you need to see it flash quickly because it receives the sketch knowledge.
In case your Sketch could not be uploaded for any motive, the Output pane will record an outline and why.
A couple of phrases about C-based languages
C is the language of working techniques. Some early Mac apps within the late Nineteen Eighties and the Nineties have been written in C or one in every of its later variants: C++.
The Arduino IDE programming language is predicated on C-like syntax.
In most C-like languages, all code strains finish with a “;” — with out the semicolon, the code will not compile and you will get an error.
Most C-based languages additionally use predefined code textual content recordsdata known as headers, which often have a “.h” file extension.
Consider a .h file as a predefined set of code that describes how features are to be accessed, known as prototypes. Every prototype defines a operate title, parameters to be handed to the operate (inside parenthesis), and a return kind that’s despatched again from the operate when it exits.
For those who name (entry) any library or built-in features in your Sketch code, the way you name every operate should match its prototype outlined in a .h file someplace. Libraries work the identical approach.
For instance, if a prototype says a operate should take two enter parameters (within the parenthesis), and a sure kind of return worth (listed earlier than the operate title), then it’s essential to name it in exactly the identical approach. Anything will throw an error throughout compilation.
Header recordsdata may include a C-style assemble known as a ‘outline.’ A outline creates a label as one other code expression, equivalent to a quantity, textual content (a string in C), a calculation, or another operate.
To create a outline, you employ the #outline C preprocessor directive. For instance:
This code defines the label ‘FALLING’ as the worth of two. Wherever you employ FALLING in your code, the quantity 2 shall be substituted at compile time. #defines can get fairly complicated however could make your code shorter and extra readable.
The Arduino IDE makes use of #defines to outline issues like I/O pin numbers, modes, and different issues.
You too can create your individual headers and #defines.
Headers could be included in different recordsdata – in different .h recordsdata, or in Sketches themselves. The contents every included .h file get inserted at compile time into the highest of any recordsdata they’re included in.
To insert a header into one other file, use the #embody C directive. For instance on the prime of Arduino.h you may see:
Which incorporates one other header file known as “binary.h” into the highest of Arduino.h at compile time.
For those who have a look at the screenshot proven above you may see two included .h recordsdata within the instance Sketch:
All this may increasingly appear complicated at first, nevertheless it’s really fairly easy: you place operate prototypes and #defines in .h recordsdata to allow them to be utilized in many different recordsdata. Then you definately #embody them in different recordsdata and the compiler inserts them the place indicated throughout compilation. Straightforward.
Organizing definitions into seperate headers allows code reuse.
Simply consider .h recordsdata as definitions, and your Sketch recordsdata as packages that use them.
Fashionable programming languages equivalent to Apple’s Swift and Microsoft’s C# have achieved away with header recordsdata, within the curiosity of simplicity.
Again to the Blink instance
Within the Blink pattern’s setup() operate, there may be one line of code:
pinMode(LED_BUILTIN, OUTPUT);
Each LED_BUILTIN and OUTPUT are #defines outlined by Arduino headers. The principle Arduino header file is called Arduino.h, as we noticed above.
You may maintain down the Command key in your Mac keyboard and double-click any #outline in an editor window to leap to its definition within the corresponding .h file the place it is outlined. A brand new tab will open in the identical editor window displaying the matching .h file.
LED_BUILTIN is outlined as “13” in pins_arduino.h:
This means digital pin 13 on the Arduino’s pins connector (additionally known as a header).
However on the similar time LED_BUILTIN tells the Arduino to make use of the precise built-in LED on the Arduino circuit board itself. For those who join a jumper wire to pin D13 on the Arduino header, then join it to an LED on a breadboard, it would blink that LED additionally.
pinMode’ is a built-in Arduino operate that units how a given I/O pin on the Arduino behaves – both enter or output. On this case, we’re telling the Arduino to make use of pin LED_BUILTIN (13) as an output pin.
Since pinMode()’s prototype within the wiring_digital.h header has a return kind of ‘void’, the operate would not return any worth. ‘void’ is a C knowledge kind that means ‘nothing’. All C features having a ‘void’ return kind return nothing.
When the compiled Blink sketch runs in your Arduino, it runs setup() first, organising the {hardware}, then it runs loop() time and again perpetually. Within the Blink instance, loop() merely turns the pin on and off with a delay of 1 second between every:
digitalWrite(LED_BUILTIN, HIGH);  // flip the LED on (HIGH is the voltage stage)
delay(1000);
digitalWrite(LED_BUILTIN, LOW);   // flip the LED off by making the voltage LOW
delay(1000);
“Excessive” and “Low in electrical engineering phrases merely imply “on” and “off”.
digitalWrite() is a built-in Arduino operate that merely turns the digital U/O pin specified on or off – on this case no matter is hooked up Arduino pin D13, or LED_BUILTIN.
delay() is a delay operate that halts additional processing till the required interval has elapsed. delay() takes a single time worth, in milliseconds, with a price of ‘1000’ being one second.
Go forward and click on the Add button within the Blink Sketch IDE window.
That is it. You have now compiled and run your first sketch. If all the things labored, you will notice the built-in LED in your Arduino blink on and off.
Most shields even have a built-in LED on them which does the identical factor because the built-in one on the Arduino.
A breadboard instance
Now that you have seen the Blink instance in motion, we’ll do the identical factor – however this time we’ll make an exterior LED on a breadboard blink on the similar time. For this instance you may want:
First, plug two jumper wires into the “D13” or “13” and “GND” holes on the corresponding Arduino headers.
Plug the opposite finish of the “D13” wire wherever into row one within the inside of the breadboard (any place besides within the “+” and “-” energy rails on the outer edges).
Subsequent, set up the LED onto the breadboard so the lengthy (+) leg of the LED is in the identical horizontal row because the “D13” wire you simply put in.
Flip the LED sideways so the quick leg is inserted right into a gap in the direction of the lengthy finish of the breadboard about three holes away.
Subsequent, insert a 220 Ohm resistor into the identical horizontal row because the quick LED’s leg, however in the direction of the facility rail on the other aspect of the board. Throughout the middle of the board works completely.
Insert the opposite finish of the resistor into one other gap in the identical path about three holes away.
It’s best to now have the “D13” wire, LED, and resistor in a sample considerably within the form of a stretched-out “Z” (see photograph beneath).
On the different aspect of the breadboard within the final or second to final gap earlier than the facility rail, insert the opposite finish of the “GND” jumper wire. The ultimate meeting ought to look one thing like this:

Bear in mind there’s a grid of metallic rails underneath all of the holes on the breadboard. Regardless of which approach elements are oriented on the breadboard, they need to all the time type connections between elements, the Arduino, and with jumper wires to finish the circuit.
For those who already uploaded the Blink instance to your Arduino, you need to see the LED begin to blink. Each the LED on the Ardunio and the one on the breadboard ought to blink in unison. If not, return and test all of your connections once more.
Observe that some digital elements equivalent to LEDs are polar: present can solely stream via them accurately in a single path. Different elements equivalent to most resistors are non-polar: present can stream the identical via them in both path.
You may mess around with the timing worth handed to the delay() operate to hurry up or decelerate the blink charge of the LEDs. Attempt large and tiny values and watch what occurs.
By including extra digitalWrite() and delay() statements to your Sketch you may alter the blink sample: for instance, you can also make the LEDs blink Morse Code.
Remaining instance: a visitors gentle simulator
Now that you have seen the best way to blink your Arduino’s LED, we’ll use one last, barely extra complicated instance: we’ll use a third-party UNO breakout board and an exterior visitors gentle sensor board to simulate a three-color visitors cease gentle.
Alternately, you’ll find a temporized one with a countdown timer LCD additionally on PCBWay.
In our instance, we’ll use the only three-light sensor and make it change colours at temporary intervals, identical to an actual visitors gentle.
These visitors gentle boards often have three or 4 pins: one for every coloured LED, and one GND. The code is smilier to Blink, besides that you just flip all of the lights off besides one, wait utilizing delay(), then flip that one off, and the subsequent one on, in sequence.
First, we’ll join our visitors gentle sensor to a generic breakout defend now we have put in on our Arduino UNO: breakout shields are shields containing banks of analog and digital pins, GND pins, Bluetooth, and serial cable connectors.
Our visitors gentle sensor has 4 pins: R, G, Y, and GND. We’ll join digital pins 9, 10, and 11 to R, G, and Y respectively, and the fourth pin, GND to a GND pin on our defend.
Now open the Arduino IDE and begin a brand new Sketch. First, we’ll outline some issues we’ll want on the prime of the Sketch above setup().
First, we outline what number of milliseconds are in a second so we are able to specify what number of seconds to go to delay();
#outline kMillisecondsInSec 1000
Subsequent, we outline what number of seconds we would like the yellow gentle to be on for:
#outline kSecondsForYellow ( kMillisecondsInSec * 4 )
Then we outline which three pins we need to use for crimson, yellow, and inexperienced on the Arduino. As an alternative of utilizing defines, we assign the pin values every to a world variable, on this case variables of kind int (which is outlined by C):
int RED = 9;
int YELLOW = 10;
int GREEN = 11;
Consider a variable as a named container whose contents (worth) you may change everytime you need. Variables even have a kind to be able to specify what sort of values they will maintain. International variables could be accessed from wherever in a program.
Variables declared within features are known as native variables and might solely be used inside one operate. That is known as variable scope.
Subsequent, we outline world variables and assign calculations to them to simplify how we calculate seconds and milliseconds, and delay values for the inexperienced, crimson, and yellow lights in seconds. On this case we use a variable kind known as ‘unsigned lengthy int’, that are like ints, however can maintain bigger values:
unsigned lengthy int millisecondsInMinute = ( kMillisecondsInSec * 12 );	// # of milliseconds in 1 min.
unsigned lengthy int minutesForGreenAndRed = ( 1 * millisecondsInMinute ); // variety of minutes to go away inexperienced, crimson lights on.
unsigned lengthy int yellowDelay = kSecondsForYellow; // Time to go away yellow gentle on. Yellow delay is shorter than crimson/inexperienced.
Now in setup() we outline the pin modes for pins we outlined above, one every for crimson, yellow, and inexperienced:
void setup( void )
{
pinMode( RED, OUTPUT );
pinMode( YELLOW, OUTPUT );
pinMode( GREEN, OUTPUT );
}
This tells the Arduino we’ll use these three pins for output values (on this case on or off).
In loop(), we begin by turning the crimson/yellow lights off, the inexperienced gentle on, then we look forward to onDelay seconds:
void loop( void )
{
// Inexperienced - Begin
digitalWrite( RED, LOW );
digitalWrite( YELLOW, LOW );
digitalWrite( GREEN, HIGH );
delay( onDelay );
After onDelay, we flip the inexperienced gentle off, the yellow gentle on, then look forward to yellowDelay seconds:
  digitalWrite( GREEN, LOW );
digitalWrite( YELLOW, HIGH );
delay( yellowDelay );
After yellowDelay, we flip the yellow gentle off, the crimson gentle on, and look forward to onDelay seconds:
  // Crimson
digitalWrite( YELLOW, LOW );
digitalWrite( RED, HIGH );
delay( onDelay );
Lastly, after onDelay elapses, we flip the crimson gentle off, successfully resetting the simulation:
digitalWrite( RED, LOW );
}
The subsequent time the loop runs, the identical sequence repeats, beginning with the inexperienced gentle. This loop will run perpetually till stopped. We now have a working visitors gentle simulator:
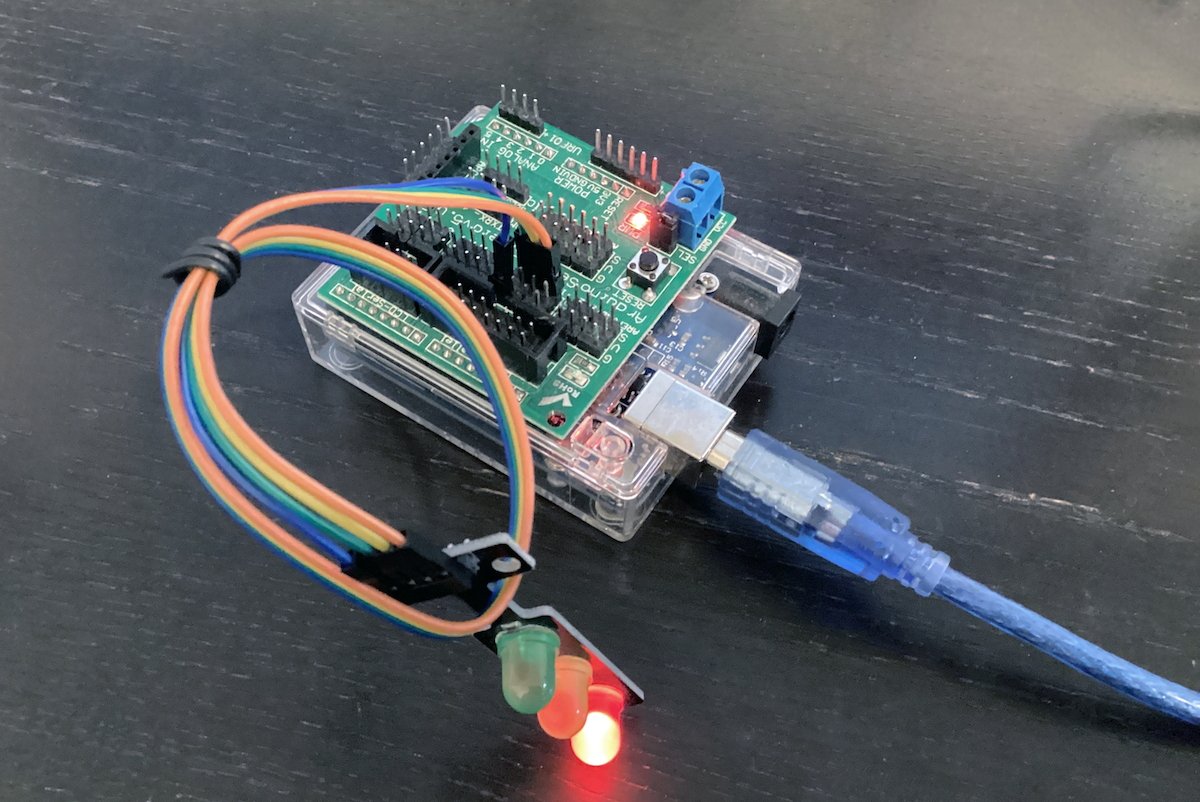
As soon as you have uploaded the Sketch to your Arduino, in case you plug in an exterior energy provide to your Arduino’s DC barrel jack, and unplug its USB cable, the simulation will proceed to run.
This is among the advantages of Arduino: when you program the microcontroller, it could actually run a program independently of a number pc.
You can also make Arduinos do absolutely anything – act as sensors, show information, look forward to enter, make sounds, use cameras and ship photographs again to different units, monitor situations, drive motors, and so forth.
I’ve posted the entire visitors gentle Sketch. You may obtain it and add it to your Arduino.
There are a couple of introductory books value studying for studying Arduino’s C-like language:
These easy examples ought to get you began programming Arduino. As you construct your programming abilities and acquire confidence, you may increase to larger examples.
In future articles, we’ll discover programming Arduino units, shields, and busses equivalent to I2C and SPI, and creating complicated machine environments.
QUAQ6RKJRNER Кешбек 15% за анализы http://bulka100.com fmdk568knj48