

Apple’s vary of MacBooks that use the corporate’s personal Silicon M1 or M2 processors can’t natively join multiple exterior monitor, which is a large limitation on the earlier Intel-based technology of Mac laptops that might run two shows when related to a USB-C or Thunderbolt 3 docking station or hub.
The M1 Professional and M1 Max do assist a number of exterior shows, so homeowners of those Mac laptops can calm down.
We hoped the M2 would lose the M1 limitation, but it surely survives on the plain M2; when obtainable, anticipate the M2 Professional and M2 Max to assist extra shows, identical to their M1 siblings.
M1 MacBook Air: Most one exterior show
M2 MacBook Air: Most one exterior show
M1 MacBook Professional: Most one exterior show
M2 MacBook Professional: Most one exterior show
M1 Professional MacBook Professional: Most two exterior shows
M1 Max MacBook Professional: Most three exterior shows
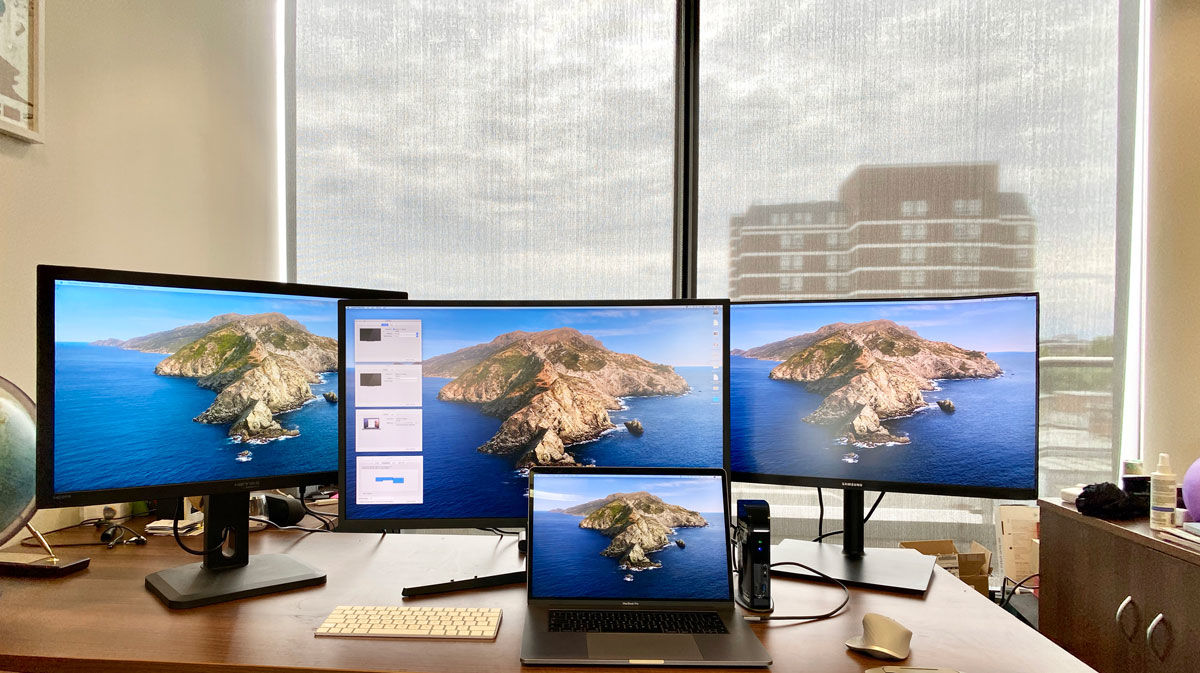
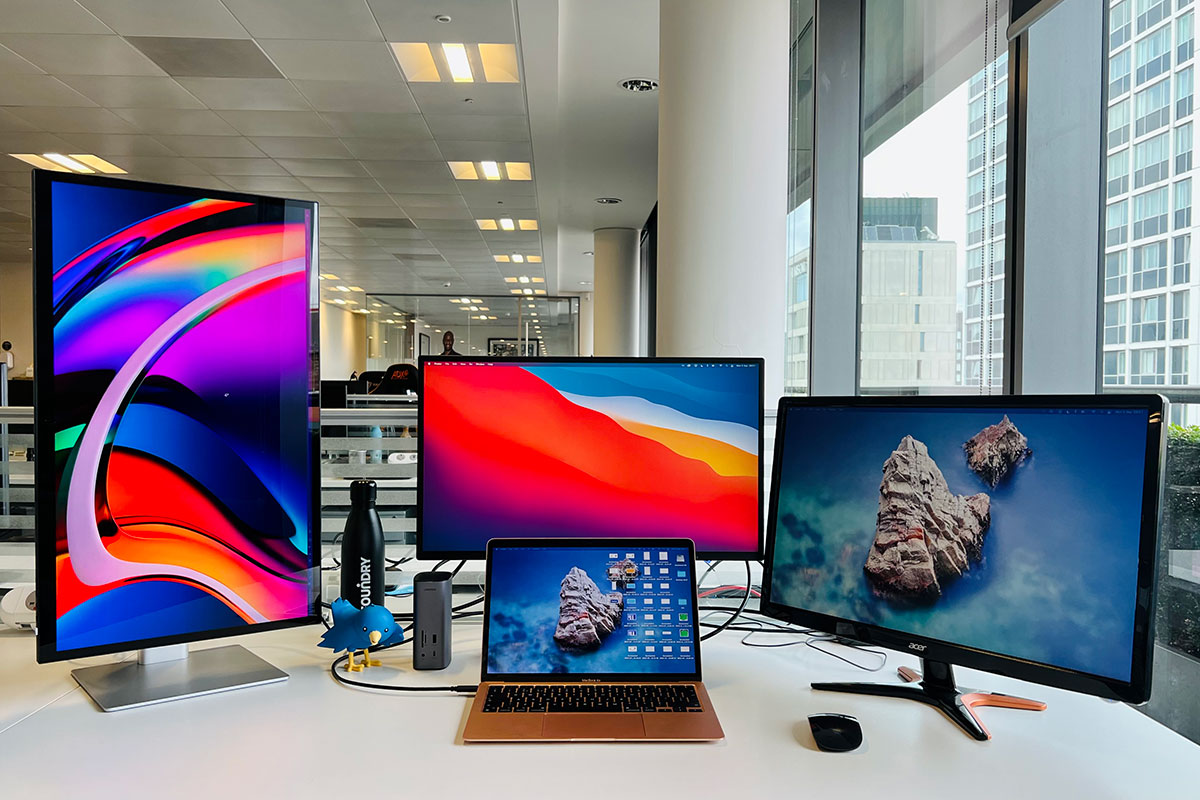
Nevertheless, there are methods round this plain M1/M2 limitation, permitting you to run two or extra exterior shows off an M1/M2 MacBook, which we are going to define right here. In every case, there’s a free software program obtain and a docking station, hub or adapter required.
With the software program workaround, there are some dangers concerned as you’ll be required to put in third-party drivers, and these may later be unsupported by future updates of the macOS.
Exterior shows: huge drawback for M1 and M2 Macs
Apple’s Mac mini, MacBook Air, and MacBook Professional 13in have been the primary Macs to function the Apple-designed M1 CPU. They obtained rave opinions for his or her pace enhancements over Intel-based laptops, together with right here on Macworld.
See our comparability of the 13in MacBook Professional (M1) vs MacBook Professional (Intel) and MacBook Air (M1 Silicon) vs MacBook Air (Intel). We have now additionally regarded on the variations between the Mac mini (M1) and Mac mini (Intel), and have a look at what we will anticipate from the new M2 Macs.
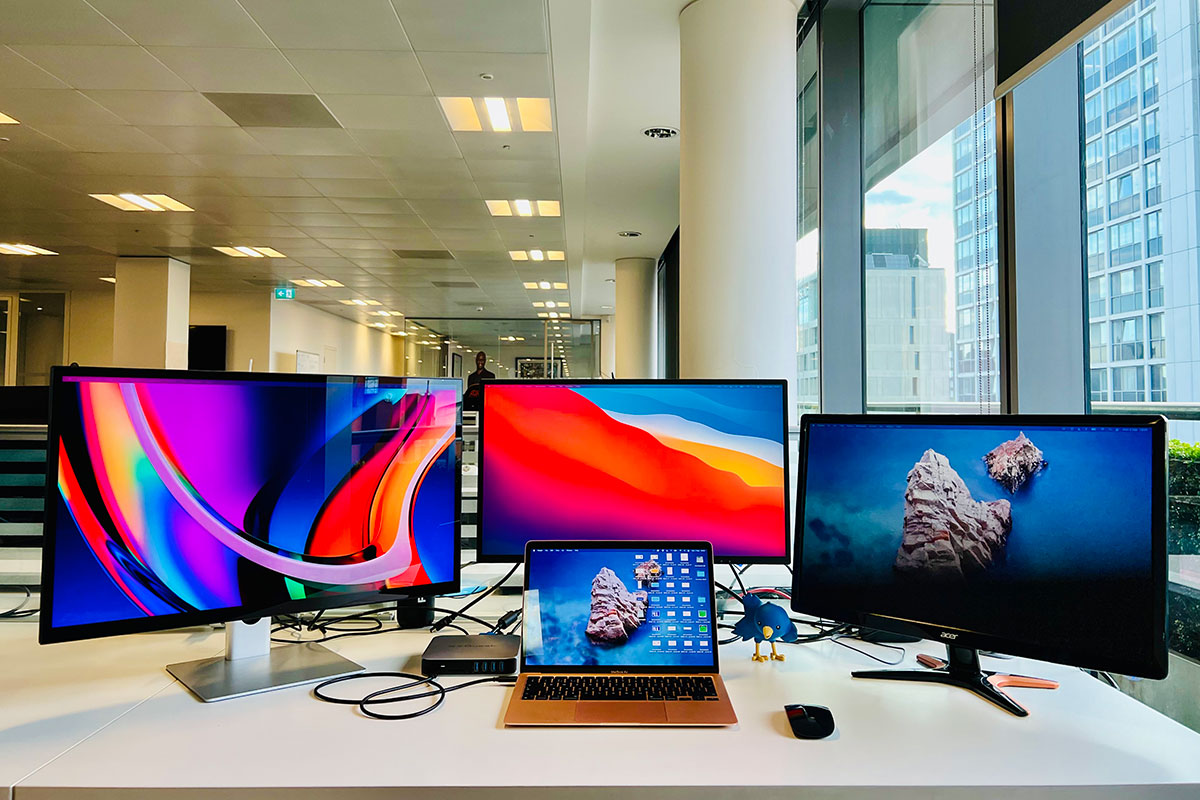
But when your MacBook setup consists of working multiple exterior show, you will have a serious drawback. Apple’s M1 or M2 chips merely gained’t contemplate it—not less than natively.
Apple states within the M1 and M2 MacBook Air and MacBook Professional tech specs that they assist solely “one exterior show with as much as 6K decision at 60Hz”.
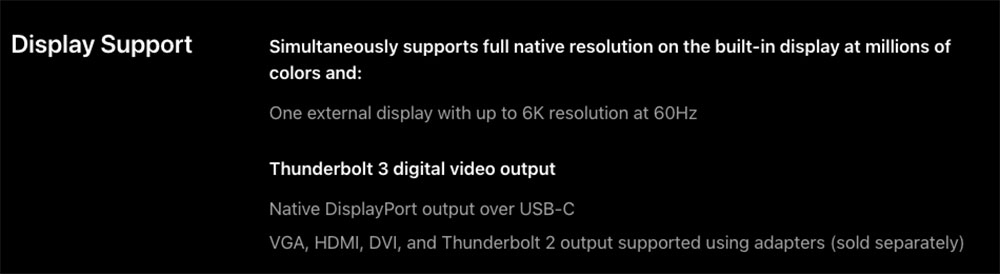
Apple
Whereas the M1 and M2 MacBooks natively assist only one monitor, the M1 Mac Mini does natively assist as much as two exterior displays—one by way of the HDMI port and a second by way of USB-C. However the M1 fashions of the MacBook Air and MacBook Professional assist just one exterior show.
Apple has apparently promised to repair the issue in a future macOS replace, however the arrival of the later M1 Professional and M1 Max—and extra just lately the M2—counsel that M1 homeowners might be ready a very long time. We have now this information to Displays for M1 Macs and what you want to know earlier than shopping for. We additionally cowl the fundamentals of easy methods to join your Mac to an exterior monitor.
Workaround #1: set up DisplayLink software program drivers
You should use a mixture of show applied sciences to get across the M1/M2 MacBooks’ single-monitor limitation. This could work with most third-party docks, though some producers, corresponding to Caldigit, don’t advocate it.
Many multi-display docks use a mixture of native USB-C Alternate Mode (native “Alt Mode” video output) and DisplayLink expertise. This mix serves as a workaround to the M1/M2 platform supporting solely a single exterior show by way of USB-C.
Observe that DisplayLink requires a third-party driver to be put in on the Mac. There are completely different variations of the DisplayLink driver, and a few convey their very own compromises to the social gathering. However, basically, setup is easy.
The DisplayLink macOS app or DisplayLink Supervisor app are methods of enabling DisplayLink expertise on macOS. The app is on the market as a standalone installer quite than by way of the mac App Retailer.
1. First, obtain the most recent Mac DisplayLink driver.
DisplayLink Supervisor Graphics Connectivity App v. 1.7.0 is suitable with macOS Catalina 10.15, macOS 11 Huge Sur and macOS 12 Monterey. It may be managed by way of the DisplayLink icon within the Apple Menu bar.
The macOS requires the person to allow “Display screen Recording” to ensure that DisplayLink gadgets to work correctly. This may be present in System Preferences below Privateness in Safety & Privateness; navigate to Display screen Recording within the listing on the left, then tick the Display screen Recording permission for DisplayLink Supervisor after unlocking the padlock utilizing your admin password. You might have to give up and restart DisplayLink Supervisor afterwards.
Extra in-depth particulars on DisplayLink Supervisor below macOS Huge Sur, Catalina and Monterey, on this DisplayLink assist web page.
Set up is easy. Older variations didn’t assist laptops’ closed-display/Clamshell mode, however 1.7.0 does assist Clamshell mode if the MacBook is Intel-based working macOS 12 or if the MacBook is M1-based working macOS 11 or 12.
Different limitations embody incompatibility with show rotation. Rotation on Apple M1/M2 requires DisplayLink Supervisor 1.6+ with macOS 12+.
There’s an choice in DisplayLink supervisor to “launch at startup”, or you possibly can drag the DisplayLink Supervisor to your Login Objects in Customers & Teams.
2. Then join the MacBook to a docking station.
3. For the primary display screen you possibly can join by way of the dock’s DisplayPort or HDMI Port, and this might be dealt with natively by the M1/M2 MacBook.
You possibly can additionally join the primary exterior show by way of the dock’s different show ports or by way of a Thunderbolt or USB-C to HDMI or DisplayPort adapter.
The HDMI or DisplayPort output makes use of Alternate Mode (Alt Mode), and as it’s principally a pipeline on to the system’s native GPU, it’s going to behave identical to should you connected a USB-C to HDMI dongle to your laptop computer. This requires no person driver set up.
The second and third shows will depend on the DisplayLink software program. DisplayLink makes use of an put in driver and the system CPU and GPU to transform graphics knowledge on the system into knowledge packets. That knowledge is then despatched over the cable as knowledge packets, and transformed again to video data and output to the displays by way of the DisplayLink chip within the docking station.
Workaround #2: set up InstantView software program
One other third-party software program answer is SiliconMotion’s InstantView, which operates in the same technique to DisplayLink and works with three of the {hardware} hubs and adapters we assessment beneath.
The preliminary setup is simpler than DisplayLink with the hubs from Hyper however smilar with the Satechi hub—but it surely suffers the identical problem that Apple’s software program updates can disable it, which is able to entail putting in a more recent model and permitting the required safety & privateness settings for display screen recording, simply as with DisplayLink.
You may obtain the newest model of InstantView software program right here.
Neither software program answer is sophisticated and each labored nicely in our exams as you possibly can learn beneath.
Which docks assist DisplayLink and InstantView?
Initially, dock producers didn’t formally supported such a DisplayLink setup for Macs. The answer works, however they rightly warned that this might change into unstuck in future variations of the macOS. At any time when there’s a new OS replace the drivers could have to be up to date every time.
Nevertheless, after some current testing and enhancements Plugable, for instance, has up to date its compatibility to formally assist that configuration. For Mac compatibility, it has validated each Apple and Intel platforms working not less than macOS 11. For M2, the corporate does anticipate compatibility however is awaiting new M2 MacBooks for testing and validation.
Which dock is greatest?
A docking station connects to your MacBook by way of Thunderbolt or USB-C. It then presents a number of ports that your laptop computer now has entry to. These can embody new show ports, corresponding to HDMI, in addition to Gigabit Ethernet for wired Web entry, USB-C/Thunderbolt/USB-A ports at various speeds, audio plugs and card readers.
Be taught extra in regards to the greatest Thunderbolt docking stations for extra particulars, or you possibly can join by way of a less complicated USB-C hub. Search for a dock with two or extra show ports, ideally ones that may connect with your most well-liked shows with out the necessity for an adapter. Some, such because the Anker Apex, have two show ports however Anker warns towards utilizing it with Macs, although DisplayLink ought to work round the issue.
Thunderbolt 4 docks or hubs usually don’t have any devoted show port however three obtainable TB4 ports that can be utilized to attach on to a USB-C show or by way of adapters to HDMI or DisplayPort displays. Whereas you will have to purchase an adapter cable, 40GBps Thunderbolt 4’s port flexibility and backwards compatibility are really helpful for customers of recent Macs such because the M1 and M2 MacBooks.
USB-C docks and hubs are normally cheaper, although.
Docking station and hub producers at the moment are actively advertising their merchandise as options to the M1/M2 exterior show limitation. Every requires both the DisplayLink obtain or one other related software program answer, corresponding to InstantView, however no additional {hardware} adapter apart from the dock or hub itself. And naturally these hubs supply the standard multi-port advantages in addition to the exterior monitor answer.
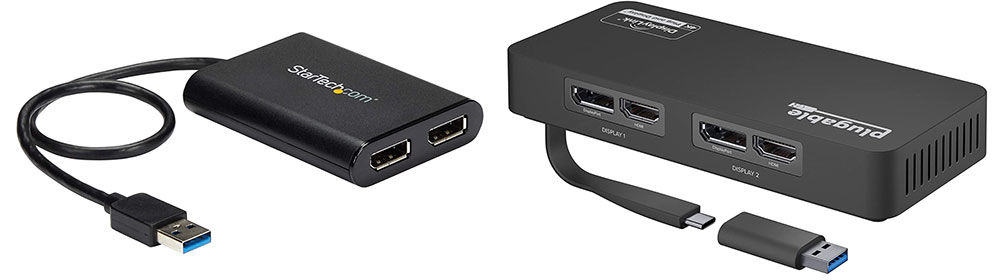
In case your hub or dock has only one show port, you can additionally connect a second or third show by way of a number of of the spare USB-A ports, utilizing an adapter corresponding to StarTech.com USB 3.0 to HDMI / DVI Adapter. This prices $80 or £80, so must be factored in when pricing an M1/M2 MacBook buy should you require a number of displays and wish to use the USB-A port quite than a show port corresponding to HDMI or DisplayPort. An alternative choice is Plugable’s USB Twin 4K Show Adapter.
This adapter turns an obtainable USB-A 3.0 or USB-C port into one DVI-I or VGA port (DVI to VGA adapter included) and one HDMI output. Every show can concurrently assist the utmost decision of 2048×1152 at 60Hz. Make certain to make use of an lively HDMI DisplayLink adapter that may assist 4K at 60Hz, as some are restricted to 4K at 30H
The perfect multiscreen hubs and adapters for M1 and M2 MacBooks
Beneath we’ve gathered the perfect devoted hubs and docks for multiscreen M1/M2. Observe that these listed (and examined) beneath use USB-C quite than Thunderbolt, so don’t profit from the MacBook’s potential 40Gbps knowledge bandwidth. In case you require all 40Gbps, go for a Thunderbolt dock and set up DisplayLink as instructed above.
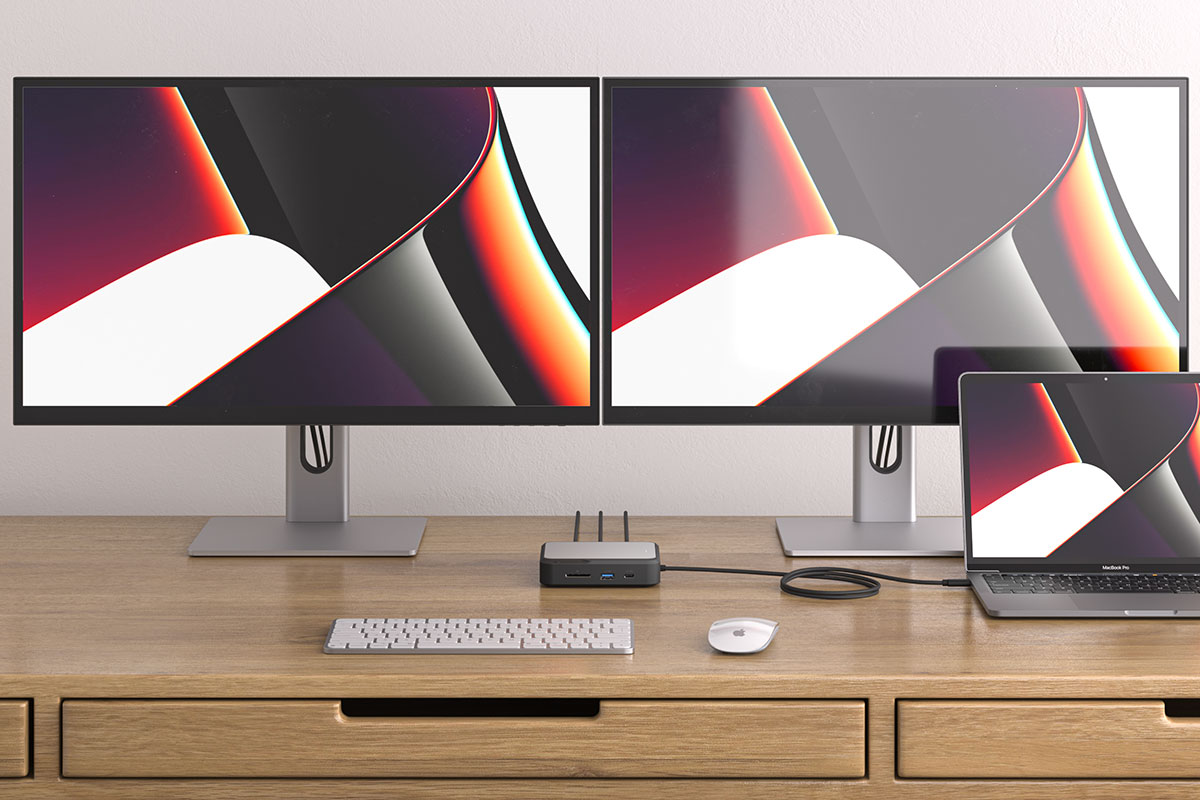
Ugreen USB-C Triple Show Docking Station
Execs
- Helps three exterior shows at 4K 60Hz
- 12 ports, inc. 10Gbps USB-C and USB-A
The Ugreen USB-C Triple Show Docking Station is a top quality compact vertical dock helps as much as three exterior shows on a plain (non-Professional or -Max) M1/M2 MacBook should you set up DisplayLink software program.
Priced at $329/£369, it options two HDMI ports and a DisplayPort and may assist three 4K shows at 60Hz on a Mac. There are 12 ports in whole, together with Gigabit Ethernet, card readers and 10Gbps USB-A and USB-C ports. It connects to the MacBook by way of 10Gbps USB-C.
It’s essential to set up DisplayLink in your Mac—directions above. Ugreen might make this simpler with a hyperlink on its web site.
Learn our full Ugreen USB-C Triple Show Docking Station assessment.
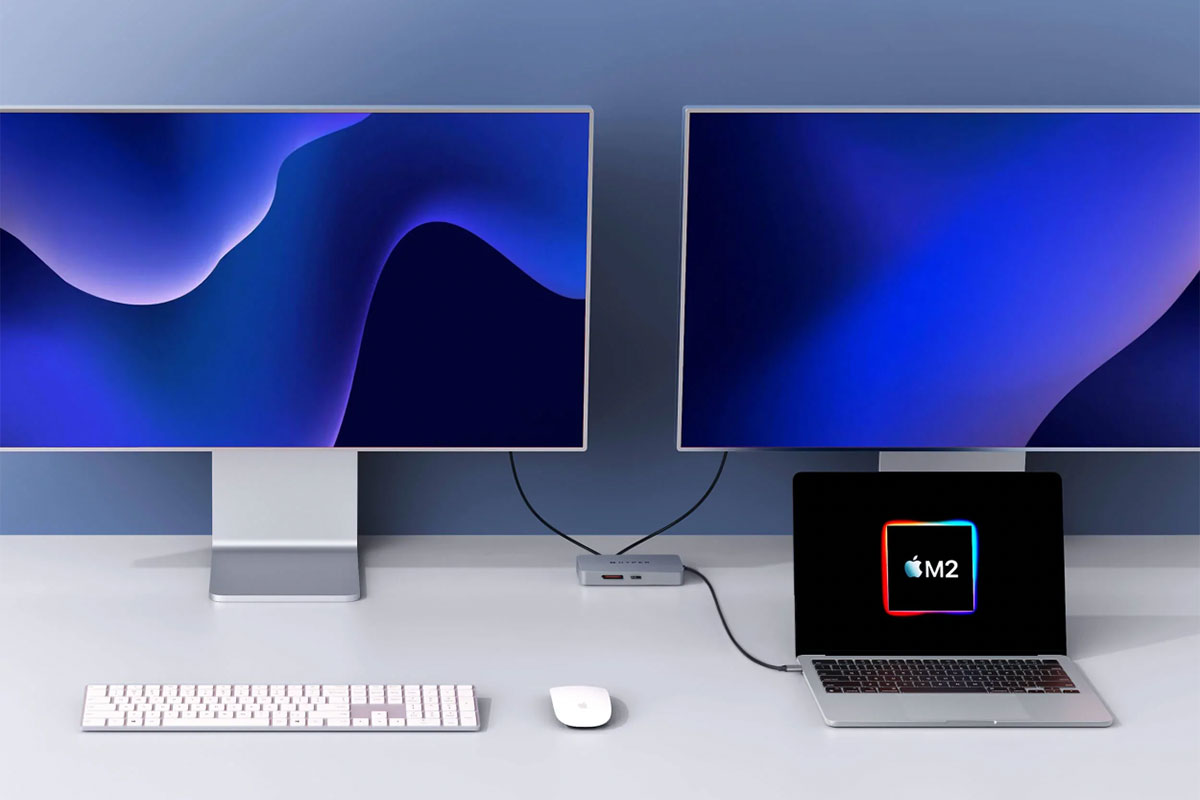
Hyperdrive Twin 4K HDMI 10-in-1 USB-C Hub
Execs
- Helps two exterior shows at 4K
- 10 ports, inc. 5Gbps USB-C and USB-A
- InstantView simpler than DisplayLink
Cons
- Second 4K show is 30Hz quite than 60Hz
- Requires USB-C charger
The Hyperdrive Twin 4K HDMI 10-in-1 USB-C Hub doesn’t use DisplayLink and as an alternative makes use of SiliconMotion’s InstantView.
Hyper says that it really works “with out having to obtain cumbersome drivers” however there’s some software program set up concerned, and you want to permit InstantView entry to your Privateness settings in System Preferences. You join the hub or adapter to your M1 MacBook and discover the HyperDisplay app that seems in a Finder folder sidebar. Double-click the macOS InstantView icon and observe the System Preferences directions. As soon as this has been accomplished your MacBook will mechanically acknowledge the adapter from then on.
It’s a neater answer than DisplayLink however with the identical capability to permit M1 and M2 Macs to connect with a number of exterior shows.
This compact hub nonetheless consists of 10 ports, together with the all-important 2x HDMI. The primary show at 60Hz is added by way of HDMI and DP Alt-mode and the second at 4K 30Hz by way of HDMI and InstantView.
Additionally included are Gigabit Ethernet, MicroUSB card reader (UHS-I), 3.5mm audio jack, 2x 5Gbps USB-A and one 5Gbps USB-C.
An extra USB-C PD port lets you cost the related laptop computer at as much as 100W—helpful because the hub itself makes use of up certainly one of your M1 or M2 laptop computer’s two Thunderbolt ports.
Satechi USB-C Multimedia M1 Adapter
Execs
- Helps two exterior shows at 4K
- 6 ports, inc. 5Gbps USB-C and 2x 5Gbps USB-A
Cons
- Second 4K show is 30Hz quite than 60Hz
- Requires USB-C charger
The Satechi USB-C Multimedia M1 Adapter makes use of InstantView quite than DisplayLink however the set up course of is virtually the identical once you observe the guide.
It consists of 2x HDMI ports: certainly one of which might assist a 4K show at 60Hz and the opposite at 30Hz.
It’s greater than a mere show adapter, although, because it additionally boasts USB-C PD passthrough charging at as much as 85W, one 5Gbps USB-C port and two 5Gbps USB-A ports.
Though named after the M1 processor it’s fixing on the a number of show entrance, it’s going to additionally work with equally restricted M2 MacBooks.
Hyperdrive Twin 4K HDMI Adapter
Execs
- Helps two exterior shows at 4K
- InstantView simpler than DisplayLink
Cons
- Second 4K show is 30Hz quite than 60Hz
- No different ports besides passthrough charging
- Requires USB-C charger
Just like the Hyperdrive Twin 4K HDMI 10-in-1 USB-C Hub, Hyper’s cheaper Twin 4K HDMI Adapter makes use of the easier InstantView software program quite than DisplayLink.
Missing some other ports, it’s not a hub and so simply facilitates the dual-display operate on M1 and M2 Macs. Whereas it’s cheaper than its 10-port sibling, we’d advocate the extra in a position hub—until you want three shows, through which case you’d want to take a look at the opposite hubs and docks reviewed right here.
One HDMI port helps 4K shows at 60Hz, however the different on the slower 30Hz.
A passthrough USB-C port requires a USB-C charger however can provide 100W to the related laptop computer.
In case you’re based mostly exterior the US, beware as Hyper fees $80 worldwide delivery, making this adapter dearer than its 10-port sibling.
Alogic Twin 4K Common Compact Docking Station
Execs
- Helps two exterior shows at 4K 60Hz
- 7 ports, inc. 10Gbps USB-C and USB-A
- HDMI and DisplayPort variations
The Alogic Twin 4K Common Compact Docking Station is available in two fashions—the CH2, which options two HDMI 2.0 ports; and the CD2, with two DisplayPort ports—so you possibly can select which most closely fits the exterior shows you already personal.
Two exterior screens are in all probability sufficient for most individuals. In case you require three, see the opposite hubs and docks reviewed right here. Each screens will be as much as 4K at 60Hz. Primary directions are given on putting in the DisplayLink software program for M1 and M2 Macs.
This neat, compact dock doesn’t function as many ports as others talked about right here however what it has are top-rated: each the USB-A and USB-C ports assist 10Gbps knowledge switch. There may be additionally a Gigabit Ethernet port and a UHS-II SD card reader.
A passthrough USB-C port—you want to add a suitably highly effective charger—can deal with 100W, though 22W is required by the dock so leaving 78W for laptop computer and system charging. The dock should be related to the laptop computer to permit system charging.
EZQuest Final Plus USB-C Multimedia Hub
Execs
- Helps three exterior shows (2x 4K; 1x HD)
- VGA should you want it
- 12 ports, inc 4x 5Gbps USB-A
Cons
- Requires USB-C charger
- Second 4K show is 30Hz quite than 60Hz
- Third show is HD not 4K
The EZQuest Final Plus USB-C Multimedia Hub has two HDMI ports and a VGA port, and helps one 4K at 60Hz and one 4K at 30Hz by way of HDMI and 1080p HD by way of VGA. If you need three 4K shows, look as an alternative on the Ugreen Triple Show Dock.
It additionally options 5Gbps USB-A ports, Gigabit Ethernet and card readers.
Just like the Ugreen dock, it requires a USB-C charger for energy and may go by way of as much as 85W to the related MacBook, however connects by way of slower 5Gbps USB-C.
Baseus 17-in-1 Docking Station
Execs
- Helps three exterior shows at 4K 30Hz
- 15 (precise) ports
- 85W PD
Cons
- Requires USB-C charger for laptop computer
- 30Hz 4K not 60Hz
The Baseus 17-in-1 Docking Station has three HDMI ports, every of which might connect with an exterior 4K show at 30Hz. In case you require three 4K exterior shows at 60Hz, the Ugreen Triple Show Dock will fulfill your wants higher. If 30Hz is ok, the Baseus will prevent cash. 60Hz is healthier for avid gamers because it presents smoother video.
Its declare to have 17 ports is exaggerated barely as one is for the exterior energy provide that powers simply the dock at 12W. and one other so as to add energy the dock by way of a USB-C charger after which onto the laptop computer. But it surely has 15 different ports together with the upstream 5Gbps USB-C connection to the MacBook, plus Gigabit Ethernet, card readers and 5Gbps USB-A and USB-C ports.
Workaround caveats
At any time when there’s a new OS replace DisplayLink and InstantView drivers could have to be up to date every time.
Plugable doesn’t advocate the workaround for gaming, video enhancing, digital audio workstations (DAWs), and protected-content (HDCP) playback. For these workloads, customers will need the total throughput of a “bare-metal” native GPU connection—corresponding to supplied by the DisplayPort or HDMI port on the dock utilizing Alt Mode.
Caldigit actively recommends towards utilizing DisplayLink, because it finds it unreliable and there could be no synergy between the driving force and the dock. As a result of it requires a third-party driver, customers are on the mercy of Apple and the third-party developer to assist later variations, the corporate advised Macworld.
Nevertheless, this mix of show applied sciences does permit M1 and M2 MacBooks to run multiple exterior monitor, and the M1 Mac mini to run greater than two. And extra manufactuers are popping out with docks and hubs that assist it.
The one danger is that it might cease working at any time, though it wouldn’t hurt your system if it did, and you can merely uninstall DisplayLink.
DIsplayLink and InstantView are workarounds with a doubtlessly restricted timespan however the chances are compatibility could be restored at some stage if the worst occurred and you’ll get again your multi-monitor setup.
The Hyperdrive twin 4K HDMI {hardware} answer is the dearer however secure workaround of the 2—however in order for you as much as three shows you’ll want a dock corresponding to a kind of reviewed above and the DisplayLink answer.
Learn our M1 MacBook Air assessment and every little thing you want to know in regards to the M2 MacBook Professional and M2 MacBook Air.
If you’re wanting to make use of a second show together with your Mac and never have your Mac’s display screen on, learn our function Easy methods to flip a Mac’s display screen off.